Everything You Need To Know About How To configure KVMS Pro Software for start viewing CCTV camera in Windows 7/8/10
Previous blog, we downloaded and step by step did installation of KVMS Pro Software. If you missed that then check out first by clicking here.
Now, in this blog we are going to show you how you can add your CP Plus Brand CCTV Camera, DVR, NVR or IP Camera in the KVMS Pro Software.
Before start let me share with you, Currently, CP Plus is a No. 1 in India, leaders in advanced security and surveillance solutions Company. According to IHS Survey 2017, CP Plus is the top 4 security company in the world and is in the top 2 clubs in Asia. CP Plus products are used in many sectors, such as buildings, infrastructures, transport, hotels, hospitals, institutes, and homes.
Proudly share with you that we are authorised distributors of CP PLUS and full product range are available at Parmeshwar Electrotech Pvt Ltd – Rajkot, contact us for the best deal you are looking for your CCTV Surveillance Need.
Let’s start configuration of KVMS Pro Software
Table of Contents
1 # Run KVMS Pro Software
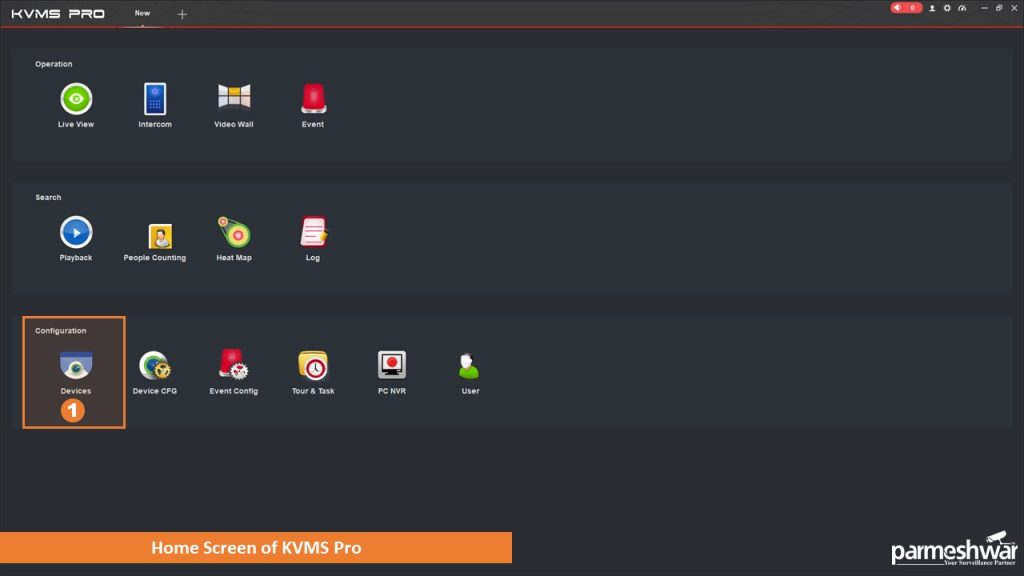
After Login with your credential you will get this Home Screen of KVMS Pro.
1.1 Click on Device, under the section of configuration for add, edit or delete devices.
2 # Run KVMS Pro Software
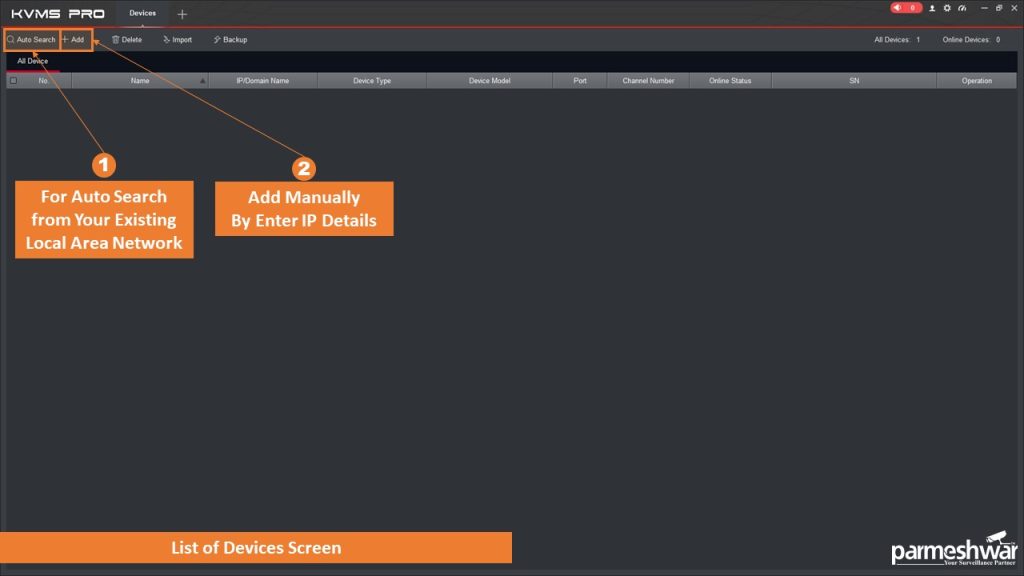
Now, You are on the list of device screens. Here you can add devices by either using auto search or adding devices details manually. I will show you here both options one by one.
Let’s start with adding devices by auto search for that press the auto search button as shown in image.
3 # Add device using auto search tools
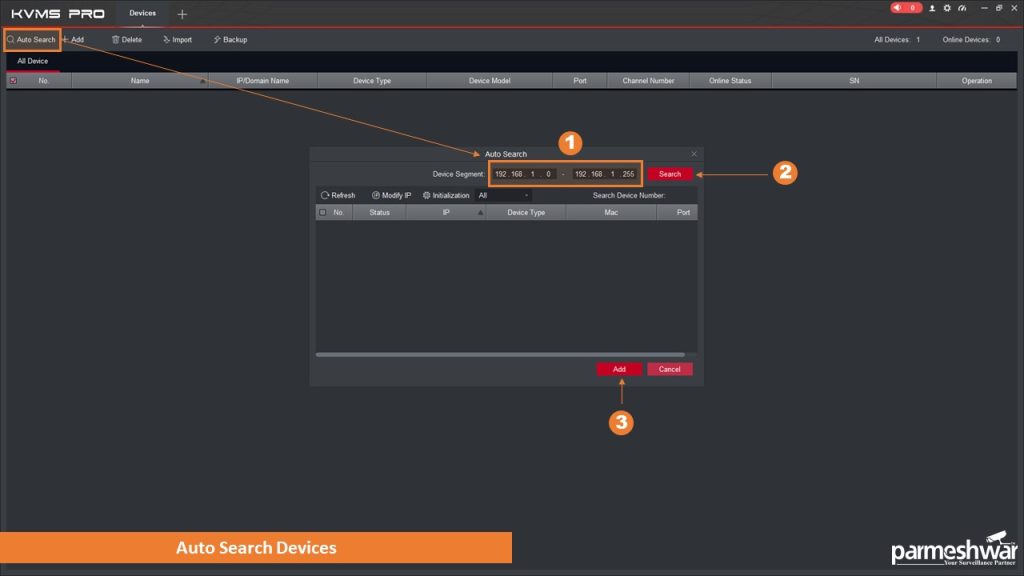
You will get another window, it will automatically find and list available devices (IP Camera, DVR, HDCVR, NVR) from your local area network.
3.1 : If you have a different IP range then change your range here
3.2 : click the search button for finding devices after setting a new IP range.
If you have not found a device yet, then check your device has power on, and also connected properly with the network. After checking you can hit refresh to find your device.
3.3 : Select desired device from available list and press add, before adding you can assign new IP Address by using modify IP button.
Let’s check other ways of adding devices, click on the add button for manually adding devices, as shown in image.
4 # Add device using manual tools
There are two methods to add manually devices.
- IP / Domain : You can use this method whenever you have a Local IP Address or Static IP Address of device.
- SN (Serial Number) : You can use this method when you use CP PLUS Server and InstaOn Service, you may find device serial on InstaOn configuration.
Let’s check both methods of adding device one by one.
4.1 # Method : IP/Domain
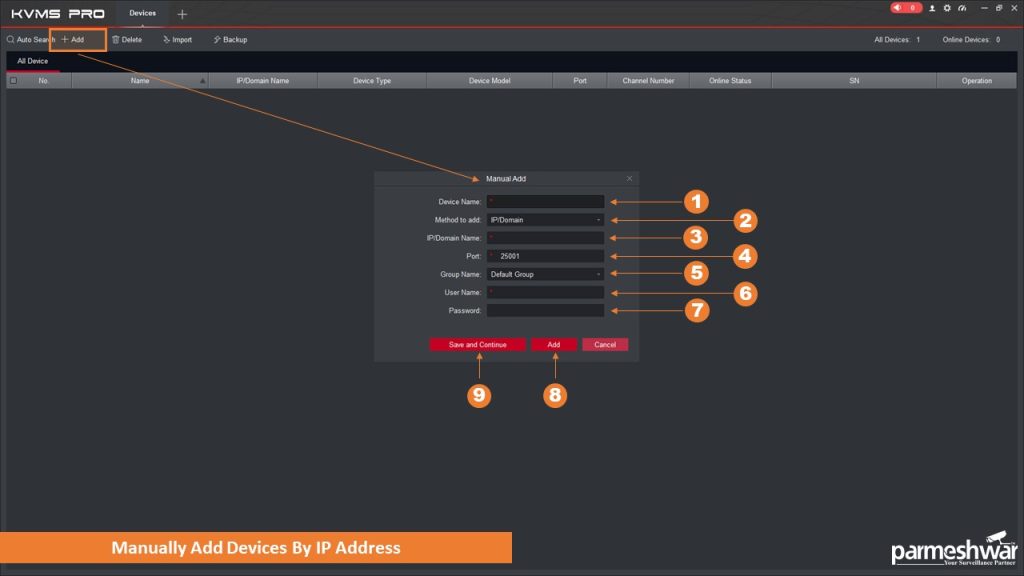
4.1.1 : Device Name : Give desired name for your device.
4.1.2 : Method to Add : IP/Domain.
4.1.3 : IP/Domain Name : Enter Device IP Address.
4.1.4 : Port : Enter Device Port (you can find port number on device configuration \ Network page, or use default port of CP PLUS products : 25001).
4.1.5 : Group Name : Choose from list or select given default. you can create different groups for managing multiple companies, locations and devices. Later on we will see how you can use this feature.
4.1.6 : User Name : Enter device user name.
4.1.7 : Password : Enter password of above entered user name.
4.1.8 : Add : Press for add device, it will add device in list and close this box.
4.1.9 : Save and Continue : use this if you want to add a device and after that want to add another one, the box will be still open there for you by this way you can save you time.
4.2 # Method : SN / InstaOn
Instaon service exclusively offered by CP PLUS, where you can register any CP PLUS network device and you will get a unique serial number. By this unique SN you can access your device from anywhere.
If you don’t have a serial number first generate from the device by using InstaOn option. Check out for more information here.
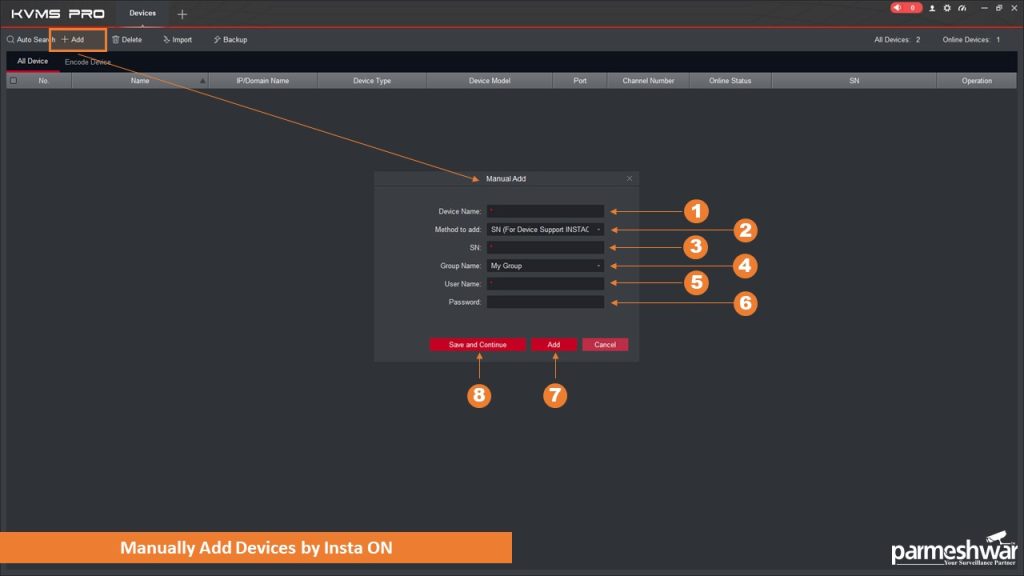
4.2.1 : Device Name : Give desired name for your device.
4.2.2 : Method to Add : IP/Domain.
4.2.3 : SN : Enter device serial number.
4.2.4 : Group Name : Choose from list or select given default. you can create different groups for managing multiple companies, locations and devices. Later on we will see how you can use this feature.
4.1.5 : User Name : Enter device user name.
4.1.6 : Password : Enter password of above entered user name.
4.1.7 : Add : Press for add device, it will add device in list and close this box.
4.1.8 : Save and Continue : use this if you want to add a device and after that want to add another one, the box will be still open there for you by this way you can save you time.
5 # Added device list screen
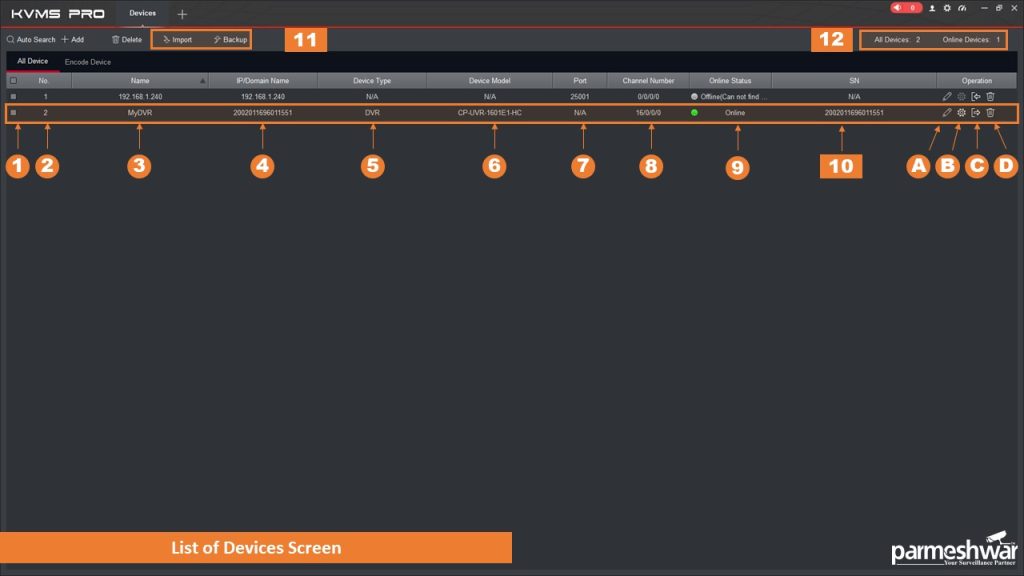
You will find a list of added devices and status, let’s see what information we get on this page.
5.1 : Checkbox : checked for selection
5.2 : No : list no of device(s)
5.3 : Name : Device given name
5.4 : IP/Domain name: IP Address of device
5.5 : Device type : you will find which kind of device it is. DVR / NVR / IP Camera etc.
5.6 : Device model :you will find device model no here.
5.7 : Port : assigned port no of device.
5.8 : Channel No : device channel details
5.9 : Online Status : current status of device, online / offline.
5.10 : SN : device serial number if it’s added through InstaOn
5 : Operation :
5.A : Modify : by pressing it can modify device added information.
5.B : Go to device config : you can access device configuration and modify it.
5.C : Manual logout : hit it for manual logout devices.
5.D : Delete : for delete device from list.
5.11 : Import / Backup : save or upload device data through this tools
5.12 : All Devices / Online Devices : you can total the number of all devices and total of online devices.
Take a pointer at the top bar Devices Tab for activate Close button, hit the button for closed this tab.
6 # Go to live view
Now this stage, you have added your DVR / NVR successfully in KVMS Pro, Now let’s start viewing CCTV Camera on Screen.
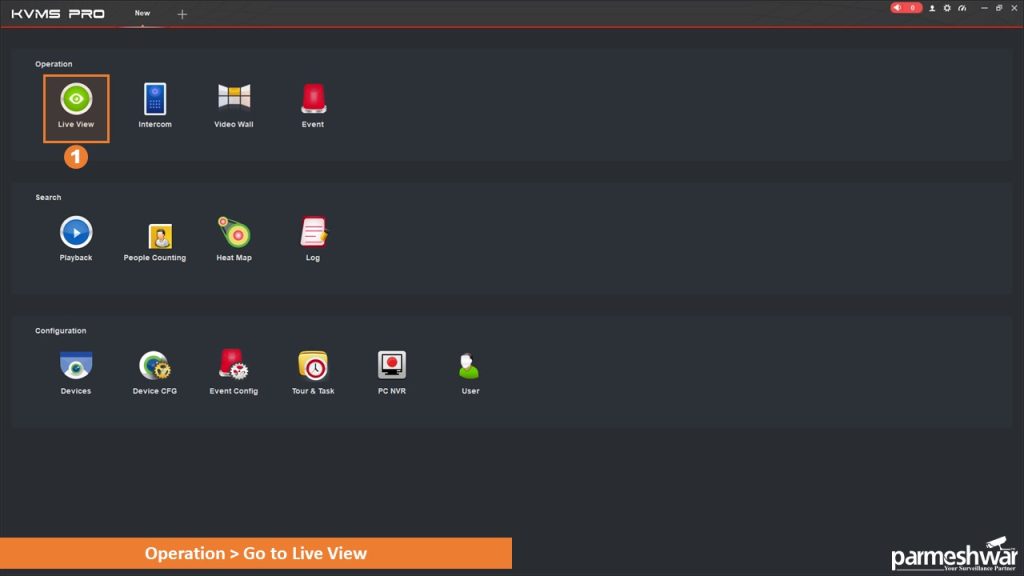
Go to Dashboard, then Click on live view under the operation section as shown on image.
7 # Login device and start camera viewing
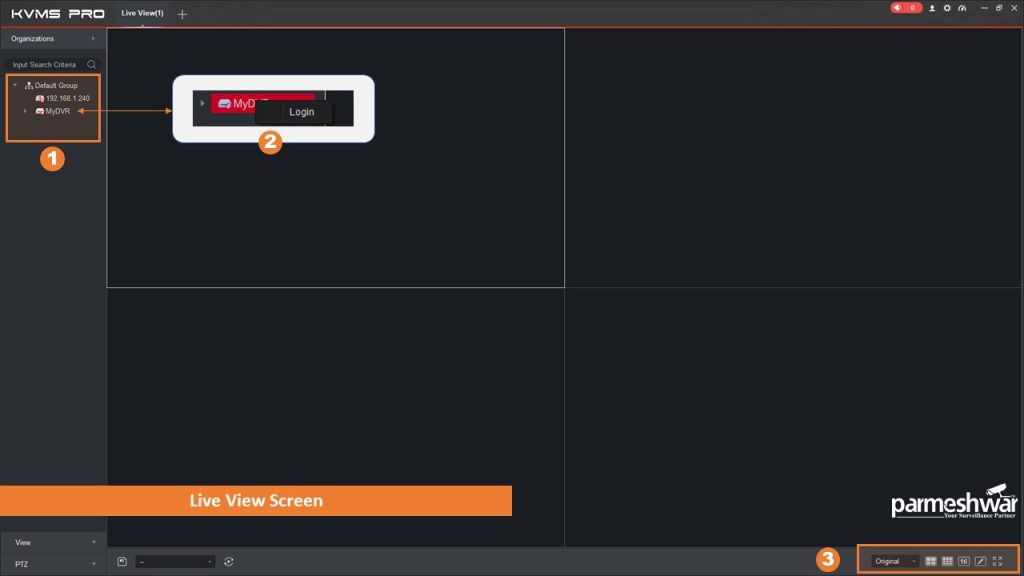
7.1 > 7.2 : Find your device under the device group and right click for login,
7.3 : Change desired split screen by selecting different options here.
For logout from DVR / NVR or IP Camera, go to the device, right click on it and choose logout.
8 # Login device and start camera viewing
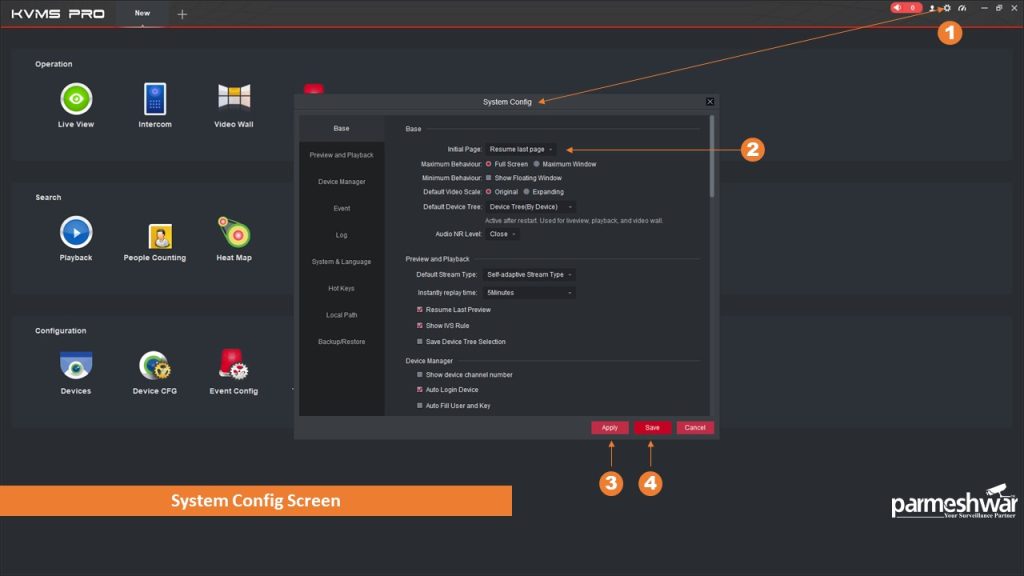
KVMS Pro software is ready to use now, one small setting will help you to remember your last screen setting.
8.1 : click on system config at header bar.
8.2 : initial page : set here, Resume last page.
That’s it. All done, CP PLUS KVMS Pro ready to monitor your CCTV Camera.
You may check out our other blogs on more features of CP PLUS KVMS Pro Software.
Video Tutorial
Conclusion :
KVMS Pro used to access CP PLUS Camera DVR, HDCVR, NVR and IP Camera. you just need to keep ready device IP Address, Port or Serial number and User Name, Password. Rest of adding devices easily managed by KVMS Pro auto search or Manually device adding tools. In addition, multiview screen options make CCTV monitoring experience more comfortable.
Share on Social Media
Checkout Video Tutorial
Share On Social Media
We Provide the Best Service in Industry
This is what our customer say…Check out yourself what they have experience.